🌿 Your trusted guide to choosing the best garden tools.

Soil Knife: The One Garden Tool That Digs, Cuts, Measures and Weeds (So You Can Leave Half Your Shed Behind)

Imagine kneeling in a flower bed with a trowel in one hand, a pair of snips in your pocket, a ruler somewhere in the shed and a bag of bulbs waiting to be opened. Every few minutes you stop, switch tools, wipe your hands and start again. Now imagine one tool that digs the hole, slices through the root, saws the stubborn vine, opens the bag and even tells you how deep the hole is.
That tool is the soil knife. It looks like a cross between a trowel and a short blade, and once you try it, going back feels strange. Gardeners, landscapers, archaeologists and even foragers carry one. In this guide you will find out exactly what it is, where it came from, how it differs from a regular trowel, which type fits your soil and your hand, and how to use it safely and well. We will also cover things many guides skip, such as sharpening angles, sheath choice, carrying rules and common mistakes.
Quick question to start: what is your biggest garden annoyance right now: compacted soil, deep-rooted weeds, crowded perennials, or planting lots of bulbs? Keep it in mind, because you will see a section that tackles it.
Want to know about trowel
A Stainless Steel Soil Knife Ready for Garden Work

What Is a Soil Knife?
A soil knife is a multi-purpose hand tool with a sturdy, slightly concave blade, usually 6 to 7 inches long, attached to a comfortable handle. One edge of the blade is smooth and sharp for slicing roots, twine and sod. The other edge is serrated for sawing through thicker roots, small branches and tough fibrous material. The blade tip is pointed so it can break into firm ground, and many models have depth markings etched into the metal.
The design comes from Japan, where the hori hori (a name roughly meaning “dig, dig”) has been used for generations in gardens and mountain foraging. Western brands adopted and adapted the idea, often calling it a soil knife or garden knife, and today it is one of the fastest-growing hand tools in home gardening.
So why does it get so much attention? Four reasons:
- Versatility. It replaces a trowel, weeder, small saw and ruler in one pass.
- Strength. The blade is thicker than a trowel and made to handle firm soil, clay and roots.
- Precision. The narrow shape lets you work between plants without disturbing neighbours.
- Efficiency. Fewer tool changes mean you finish jobs faster and with less bending.
If you have wondered whether a trowel is enough, the honest answer is that it is fine for scooping soil, but it was never designed to cut, saw or measure.
Hori Hori Soil Knife vs Other Garden Tools
A hori hori soil knife is the best-known version of this tool, but it is often compared with other garden basics. Here is how they stack up.
| Tool | Best for | Blade shape | Cuts roots? | Measures depth? | Handles firm soil? |
|---|---|---|---|---|---|
| Soil knife | Digging, weeding, dividing, planting, cutting | Narrow, concave, two edges | Yes | Often | Excellent |
| Hand trowel | Scooping soil, planting larger plants | Wide, curved scoop | No | Rarely | Moderate |
| Weeding fork | Pulling taproots | Forked tines | No | No | Moderate |
| Folding pruning knife | Cutting stems and vines | Short folding blade | Stems only | No | Poor |
| Bulb planter | Large bulbs | Cylindrical plug | No | Sometimes | Medium |
The takeaway: a trowel moves soil, while this tool does a little of everything. If you only own one hand tool, a good soil knife is arguably the better first choice.
Anatomy of a Soil Knife: What You Are Actually Holding
Knowing the parts helps you judge quality before you buy.
- Blade. Concave so it can scoop and cut. Stainless steel resists rust, while carbon steel holds a sharper edge but needs more care.
- Edges. One straight, one serrated. The straight edge slices cleanly, and the serrations saw through stubborn roots.
- Tip. Pointed for piercing hard soil, sod and compacted ground.
- Depth markings. Etched lines in inches or centimetres, perfect for planting bulbs and seedlings at the right depth.
- Tang. The part of the blade that runs into the handle. A full tang, running the length of the handle, is stronger and less likely to snap.
- Handle. Wood, rubber, composite or plastic. It should feel secure even when wet or muddy.
- Sheath. A holder, often nylon or leather, that protects both you and the blade.
- Finger guard or hanging hole. Small features that improve safety and storage.
Parts of a Hori Hori-Style Garden Tool Explained

What Is a Soil Knife Used For? More Than You Might Expect
Most people think of one or two jobs, but this tool handles a whole list.
- Digging planting holes. Perfect for seedlings, perennials, herbs and small shrubs.
- Planting bulbs at the right depth. Use the depth markings to place daffodils, tulips or garlic precisely.
- Weeding. Slide the tip down beside a dandelion, loosen the root and lift it whole.
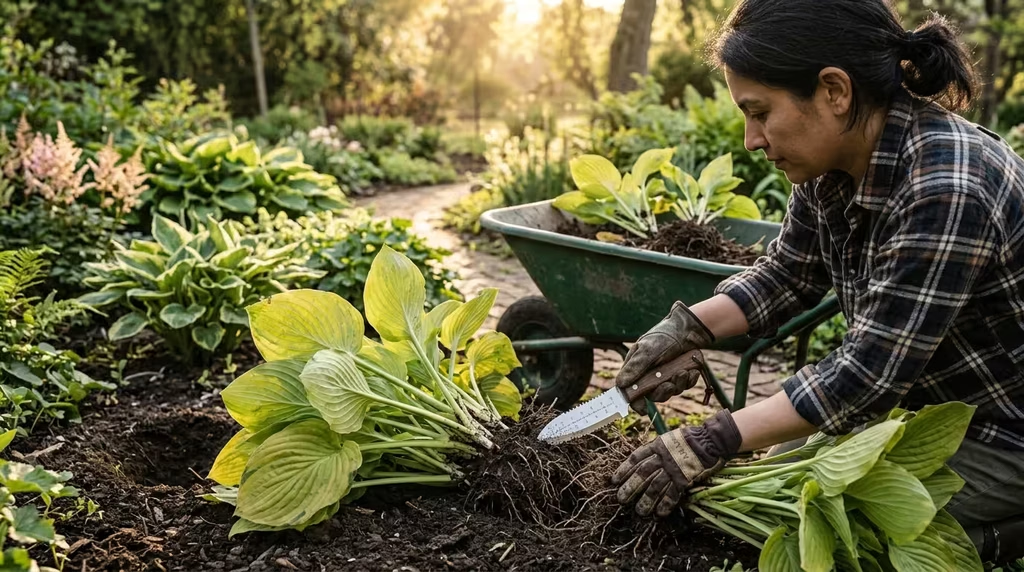
- Dividing perennials. Cut through crowded clumps of hostas, daylilies and ornamental grasses.
- Cutting sod and edging beds. Slice a straight line along a lawn edge without a spade.
- Cutting roots. Sever small tree roots and thick fibrous roots that stop a trowel.
- Opening bags and cutting twine. Handy for compost, potting mix, mulch and plant ties.
- Harvesting. Cut lettuce, dig carrots, lift potatoes and slice herbs cleanly.
- Transplanting. Lift a seedling with a good root ball and move it without tearing roots.
- Foraging and fieldwork. Foragers use it for roots, mushrooms and wild greens, and field researchers use it for soil sampling.
- Making seed furrows. Draw the tip along a line to create a shallow row for sowing.
- Pot work. Loosen compacted root balls and cut away dead roots when repotting.
Who Should Use a Soil Knife?
This is a smart purchase for:
- Vegetable and allotment growers who plant, weed and harvest in firm or clay soil.
- Perennial gardeners who divide and move plants regularly.
- Landscapers and professionals who want a durable one-tool solution on the job.
- Container gardeners who need precise control in tight spaces.
- Beginners who want a single dependable tool rather than a pile of cheap ones.
- Foragers, hikers and outdoor enthusiasts looking for a rugged digging blade.
- Gardeners with sore wrists, since a well-shaped handle and sharp blade need less force than a blunt trowel.
If you only grow a few pots on a balcony, a trowel might be enough. But the moment you deal with real soil or real roots, this tool starts to earn its keep.
Types of Soil Knives: Which One Fits Your Garden?
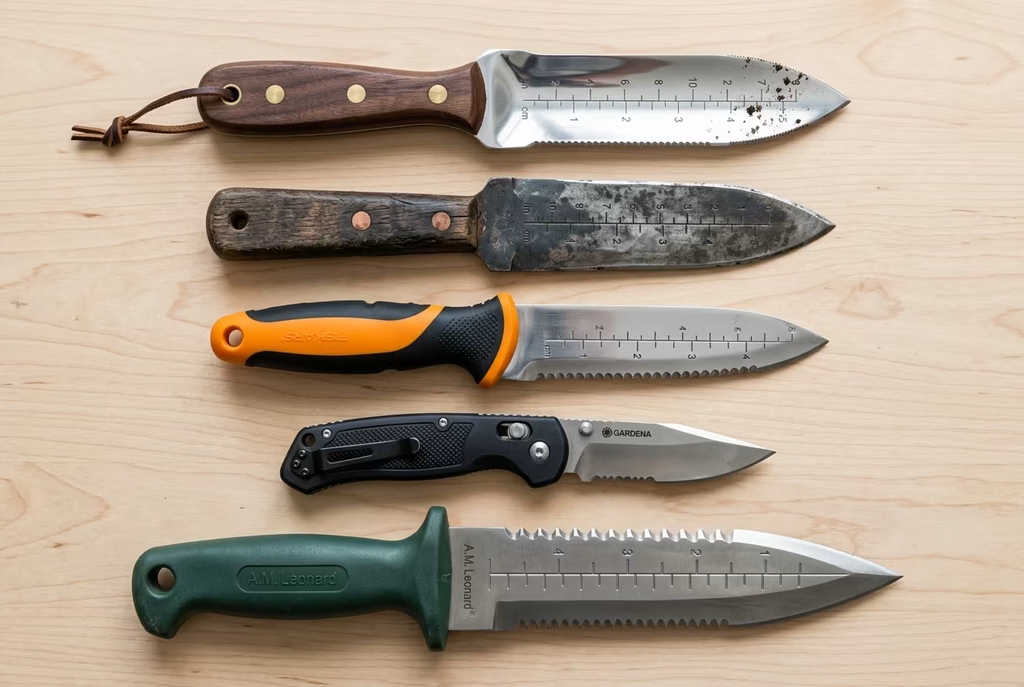
Stainless steel
This type resists rust and cleans up easily, which is ideal if you garden in damp climates or forget to dry your tools. The trade-off is that some stainless blades can be slightly softer than carbon steel, so they may need touching up more often.
Carbon steel
Carbon steel holds a razor edge and cuts effortlessly through roots. It will rust if left wet, so it needs wiping and a light coat of oil after use. Experienced gardeners often prefer it for the sharpness.
Wooden-handled versions
Wooden handles feel warm and comfortable, and they look attractive. They need occasional oiling and should not be left soaking wet.
Rubber or composite handles
Weatherproof, non-slip and easy to clean. Great for wet climates and heavy use, though they lack the traditional look.
Compact and folding versions
Smaller models fit in a pocket or backpack, which suits foragers, hikers and anyone who wants a tool on the move.
Heavy-duty and professional models
Thicker blades, full tangs and reinforced sheaths are built for landscapers and farmers who use the tool daily.
Multi-tool combinations
Some sets bundle a soil knife with a trowel or pruner. These are convenient but usually less well made than a quality standalone tool.
A.M. Leonard Soil Knife: Is the Deluxe Model Worth It?
Many gardeners search for a brand name before they search for a type, and A.M. Leonard is one of the best-known. The company has supplied horticulture professionals since the late nineteenth century, and its soil knives are popular with growers, nurseries and landscapers.
The A.M. Leonard Deluxe Soil Knife is a good example of the professional style: a stainless steel blade, one smooth and one serrated edge, depth markings on the blade and a sheath for safe carrying. Compared with budget versions, buyers typically point to a sturdier build, a better edge out of the box and a comfortable grip for long sessions. Specifications and handle styles change over time, so check the latest product page before buying.
How do you decide whether a premium model makes sense?
- Buy the premium model if you garden in firm or clay soil, use the tool several times a week, or want something that lasts for years.
- Stay with a budget model if you garden occasionally, work in light soil or simply want to try the concept first.
- Compare alternatives. Brands such as Nisaku, Barebones, Truper and Fiskars offer versions at different prices. Read recent reviews that mention long-term durability and edge retention rather than first impressions.
Honest note: a more expensive tool is not automatically better for every gardener. Fit, weight and handle comfort matter as much as the name on the blade, so hold one in your hand if you can.
Table of Contents
Stainless Steel, Carbon Steel and Compact Soil Knives Compared
How to Choose the Right Soil Knife: A 7-Step Checklist
- Match your soil. Light, loose soil works with almost any blade. Heavy clay or stony ground needs a thicker blade with a full tang.
- Choose the steel. Stainless for low maintenance, carbon for sharpness and a willingness to oil.
- Check the blade length. Six to seven inches suits most gardeners. Shorter is easier in pots, while longer digs deeper.
- Look for depth markings. They are inexpensive, practical and very useful for bulbs.
- Test the handle. It should fit your hand comfortably without hot spots. If you have small hands, look for a slimmer grip.
- Inspect the sheath. A good sheath is secure, stitched or moulded well and stays closed when you move.
- Think about weight. A tool that feels heavy after ten minutes will stay in the shed.
Pro tip: if you are unsure, start with a mid-priced stainless steel model with a wooden or composite handle and a decent sheath. It covers nearly every job.
How to Use a Soil Knife Step by Step
The tool is easy to use, but a few details make it safer and more effective.
- Wear gloves and sturdy shoes. A sharp blade and tough ground deserve basic protection.
- Hold it correctly. Grip the handle firmly, keeping your fingers behind the finger guard if there is one. Your thumb can rest along the top of the handle for control.
- Slide the tip into the soil. Push at a slight angle rather than stabbing straight down, and rock it gently if the ground is hard.
- Scoop or lever. Use the concave blade like a narrow trowel, lifting soil away from the planting spot.
- Check the depth. Read the markings against the surface to measure the hole.
- Plant and firm. Place the plant, then use the flat side of the blade to push soil back around the roots.
- Weed cleanly. Push the tip down beside the weed, loosen the soil in a circle and pull the whole root out.
- Cut when needed. Slice twine or thin roots with the straight edge, and use the serrated edge for thicker ones with a gentle sawing motion.
- Wipe, dry and sheath. Clean the blade before putting it away.
Step-by-Step Planting a Bulb with a Hori Hori-Style Tool

Recommended Planting Depth at a Glance
| Plant or job | Approximate depth | Notes |
|---|---|---|
| Tulip and daffodil bulbs | 15 to 20 cm (6 to 8 in) | Pointed end up |
| Crocus and snowdrop bulbs | 5 to 8 cm (2 to 3 in) | Plant in clusters |
| Garlic cloves | 5 cm (2 in) | Space about 10 cm apart |
| Seedling transplants | Same depth as the pot | Firm gently |
| Perennial divisions | Root-crown at soil level | Water well |
| Seed furrows | 1 to 2 cm (under 1 in) | Draw the tip along a string line |
These are general guides. Always check the plant label, seed packet or local advice, because climate and variety change the ideal depth.
Real-World Scenarios (Pick the One That Matches Yours)
“My soil is heavy clay.” Wet the area the day before, then slide the tip in at an angle and rock it gently to break the clay before lifting. Do not force a thin blade straight down.
“I need to plant 50 bulbs.” Use the depth markings to set the hole depth. After the first few holes, the rhythm becomes automatic.
“My hostas are crowded.” Lift the clump, then use the straight edge to slice it into sections, each with healthy roots and shoots.
“I hate dandelions.” Push the tip beside the taproot, loosen, then lift. Getting the full root stops regrowth.
“I’m tidying a lawn edge.” Stretch a string line, then cut a vertical slice along it. You will get a crisp edge without a spade.
“I’m repotting.” Use the blade to loosen the root ball and trim dead roots before replanting.
Which one sounds like your garden? Try it on a small patch first, then scale up.
Safety and Carrying: What Most Guides Skip
A garden blade is a real blade, so treat it as one.
- Always use the sheath when walking, travelling or storing the tool.
- Cut away from your body and keep your free hand out of the cutting path.
- Never carry it loose in a bag or pocket. A sheath prevents accidents and damage.
- Keep it away from children, and teach older children to use it with supervision.
- Do not use it as a screwdriver or pry bar. Blades can snap and cause injury.
- Know your local rules. Some places have laws about carrying fixed-blade knives in public, even gardening ones. If you are travelling or carrying it away from home, check local regulations first, and never pack it in hand luggage on a flight.
- Wear gloves when sharpening. A sharpened edge cuts more easily than you expect.
Sharpening, Maintenance and Care: Keep It Working for Years
A sharp blade is safer than a blunt one, because it needs less force.
- Clean after each use. Wipe off soil, sap and moisture with a damp cloth, then dry it.
- Dry completely. Moisture is the enemy of any blade, even a stainless steel soil knife.
- Oil lightly. A thin film of vegetable or machine oil protects the metal and wooden handle.
- Sharpen the straight edge. Use a flat file or sharpening stone at about 20 to 25 degrees, pushing from heel to tip in smooth strokes. A few passes every few weeks is usually enough.
- Leave the serrations alone, or use a small round file if they dull completely.
- Check the handle. Tighten loose parts and sand rough wood, then oil it once or twice a year.
- Store it in a dry place. Keep the blade in its sheath, hung on a hook or in a tool box, away from damp floors.
- Disinfect after diseased plants. Wipe the blade with a diluted household disinfectant or rubbing alcohol to avoid spreading problems.
Cleaning and Sharpening Your Garden Blade After the Season

A Simple Seasonal Job Calendar
Wondering when this blade earns its keep? Here is a rough year-round guide you can adapt to your climate.
- Early spring. Divide summer-flowering perennials, lift and move crowded clumps, and cut fresh edges along beds before growth takes off.
- Mid spring. Transplant seedlings, make seed furrows, and dig out the first flush of weeds while the ground is soft.
- Summer. Harvest herbs and salad leaves, pop out weeds after rain, and dig small holes for late successional sowings.
- Early autumn. Divide spring-flowering perennials and plant garlic and onion sets.
- Mid to late autumn. Plant spring bulbs at the depths listed above, and clear out spent annuals by cutting the roots.
- Winter. Clean, sharpen and oil the blade, check the sheath stitching, and plan next year’s beds.
Treat this as a starting point rather than a fixed schedule, since local weather and soil temperature matter more than the calendar date.
Common Mistakes to Avoid
- Using it as a pry bar. Levering large rocks or stumps can bend or snap the blade. Dig around the object instead.
- Skipping the sheath. An exposed blade is a risk to you and the tool.
- Pushing straight down in hard soil. Enter at an angle and rock gently.
- Letting it rust. Even stainless steel can stain if left dirty and damp.
- Dull edges. A blunt blade needs more force and slips more often.
- Cutting towards your body. Always direct the blade away from you and your free hand.
- Buying the cheapest option. A thin blade without a full tang can bend or snap on the first tough root.
- Ignoring the handle. A slippery, small or awkward grip causes blisters and accidents.
- Digging when soil is bone dry or soaking wet. Moderately moist soil is the easiest to work.
Dividing Perennials with a Hori Hori-Style Blade for Healthier Plants
Frequently Asked Questions
What is a soil knife used for?
It digs, weeds, plants, cuts roots, divides perennials, opens bags and measures depth. It works as a trowel, small saw and ruler in one tool.
What is the difference between a soil knife and a hori hori?
They are essentially the same type of tool. Hori hori is the traditional Japanese name, while soil knife is the more common Western term. Designs vary slightly between brands.
Is a soil knife better than a trowel?
It depends on the job. A trowel scoops soil and suits larger holes, while this tool cuts, saws and digs in firm soil. Many gardeners keep both.
Is a stainless steel soil knife better than carbon steel?
Stainless resists rust and needs less care, while carbon steel is often sharper but needs oiling. Choose according to your climate and maintenance habits.
Is the A.M. Leonard Deluxe Soil Knife worth the price?
Many professionals like it for its build and comfort, and it suits frequent use in firm soil. If you garden occasionally, a mid-priced alternative may be enough. Check current reviews and specifications first.
How sharp should it be?
Sharp enough to cut roots cleanly but not razor sharp like a kitchen knife. Keep the straight edge well maintained and leave the serrated edge as is.
How do I sharpen it?
Use a flat file or stone at roughly 20 to 25 degrees on the straight edge, working from heel to tip. Wear gloves and wipe the blade clean afterwards.
Can I use it in clay soil?
Yes, and it is particularly good at it. Water the area the day before and enter at an angle rather than pushing straight down.
Is it safe for beginners?
Yes, with common sense. Use the sheath, wear gloves, cut away from your body and avoid prying with it.
Can I take it on a plane or carry it in public?
Rules vary by location and airline. Fixed blades are often prohibited in hand luggage, and some places restrict carrying them in public. Check local regulations before travelling.
How do I clean and store it?
Wipe the blade clean, dry it completely, add a light coat of oil, keep it in its sheath and hang it in a dry spot.
Final Thoughts
Not every garden tool needs a battery or a long instruction manual. Sometimes the best one is a sturdy, well-balanced blade that digs, cuts and measures with ease. Whether you choose a traditional hori hori, a stainless steel model or a premium professional option, the right one makes planting, weeding and dividing quicker and less tiring.
Start simply: choose one job this week, such as planting a few bulbs or tackling a stubborn weed, and try the tool with care. Once you feel how much a single blade can do, your shed may feel a lot less crowded.
Your turn: which job will you tackle first, and which type are you leaning towards? Share your plans and tips in the comments below.