🌿 Your trusted guide to choosing the best garden tools.

Weeding Fork: The Complete Guide to Choosing, Using and Caring for Yours

You pull a dandelion, feel it snap at the neck, and two weeks later it is back, bigger and smugger than before. Sound familiar? The leaves were never the problem. The root was, and your fingers simply cannot reach it.
That is exactly the job a weeding fork was made for. It slides into the soil beside a weed, loosens the earth around the root, and lets you lift the whole plant out in one piece. No digging a crater, no trampling your flowers, no bad back.
In this guide you will learn what the tool is, how it differs from a trowel or a full-size garden fork, which type suits your beds, and how to use it step by step. We also cover care, mistakes to avoid, and answers to the questions gardeners ask most. Grab a coffee, and maybe a pair of gloves, because by the end you will know whether this humble tool deserves a spot in your shed.
want to know about flowers
A Weeding Fork Lifting a Dandelion With Its Full Taproot
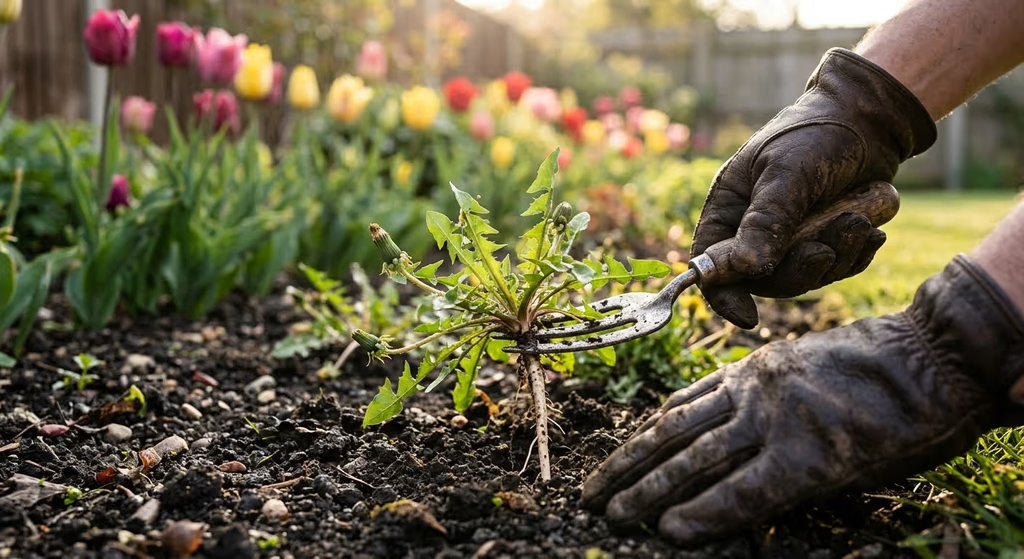
What Is a Weeding Fork?
A weeding fork is a small hand tool with a short handle and a narrow head that ends in two to four slim tines. Gardeners use it to loosen soil around the roots of unwanted plants so the weed can be eased out whole. Because the tines are thin, the tool slips into tight spaces between plants without damaging their roots.
You will also hear it called a hand fork for weeding, a hand weeding fork, a weed fork or a dandelion weeder. The names overlap, and shops use them loosely. What matters is the shape: slim, pointed tines built for precision rather than heavy digging.
The tool has a long pedigree. The famous English garden designer Gertrude Jekyll is said to have named it her favourite tool, which tells you something about how well the design has stood the test of time.
Weeding Fork vs Other Garden Tools
Not sure whether you need this tool, a trowel, or something bigger? This quick comparison helps.
| Tool | Best for | Weak at | Reach |
|---|---|---|---|
| Weeding fork | Deep-rooted weeds in tight spaces, loosening soil | Moving large amounts of soil | Hand-held, close to the ground |
| Hand trowel | Planting, scooping soil, transplanting | Lifting long taproots cleanly | Hand-held |
| Dandelion weeder (fishtail) | Single taprooted weeds in lawns | Mixed borders with many weeds | Hand-held or long handle |
| Hori hori knife | Cutting roots, slicing sod, planting bulbs | Gentle loosening of delicate beds | Hand-held |
| Full-size garden fork | Digging, turning compost, lifting root crops | Fine work between small plants | Standing, long handle |
| Hoe | Slicing young weeds on open soil | Established or deep-rooted weeds | Standing, long handle |
The takeaway: a hoe handles the open vegetable patch, while the small fork is the specialist for crowded flower borders, raised beds and containers.
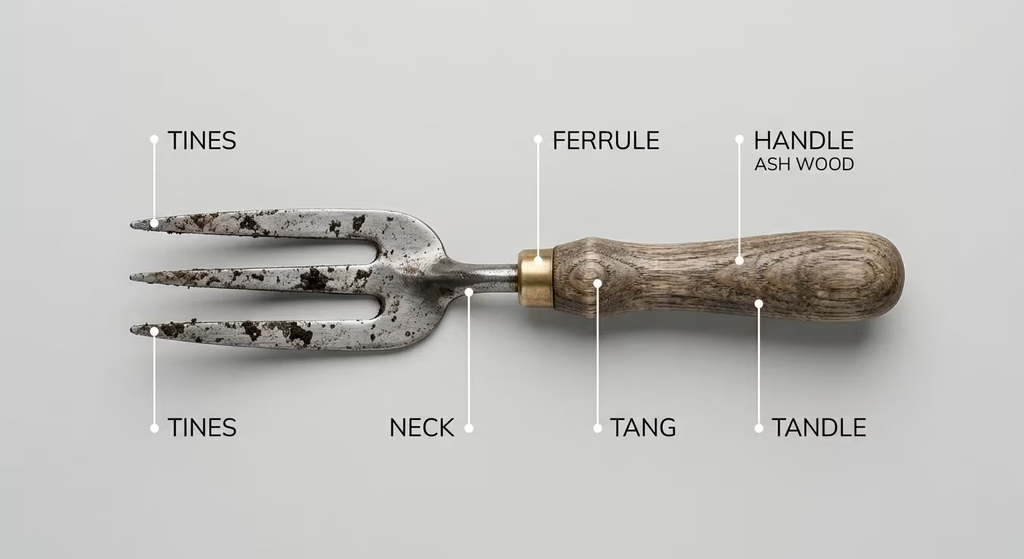
Anatomy of a Weeding Fork
Knowing the parts helps you judge quality in the shop. Here is what you are looking at:
- Tines: The slim prongs that enter the soil. Most designs have two to four. Widely spaced tines let soil fall through, while closer ones give more control in tight spots.
- Head or neck: The curved or straight section joining the tines to the handle. A forged one-piece head is stronger than a welded one.
- Tang or socket: The metal extension that connects the head to the handle. A long tang running into the grip resists snapping under leverage.
- Handle: Usually ash or another hardwood, plastic, or rubberised grip. Comfort matters because you will be gripping it for an hour at a time.
- Ferrule: The metal collar at the top of the head that keeps wooden handles from splitting.
- Hanging hole: A small hole at the end of the handle so the tool can hang in your shed.
Some premium versions use tines that are pointed at the tip but rounded along the shaft, which helps the tool enter hard soil while protecting neighbouring roots.
Parts of a Hand Weeding Fork Explained
Types of Weeding Fork
Not every fork is built the same. Pick the type that matches your garden.
Two-Tine Hand Fork
The classic design. Two slim tines straddle a weed’s root and lever it up. It excels at taproots like dandelions, dock and thistle, and works well in crowded borders.
Three- or Four-Tine Hand Fork
A wider head covers more ground. It is better for loosening soil around clumps of shallow-rooted weeds and for breaking up crusted earth between seedlings.
Long-Handled Weeding Fork
Same idea, but with a handle long enough to use while standing. Ideal for raised beds, lawns and anyone with sore knees.
Stainless Steel vs Carbon Steel
Stainless steel resists rust and slides through soil easily. Carbon steel is often tougher and holds a sharper point, but it needs drying and oiling to avoid rust.
Ergonomic and Soft-Grip Models
Cushioned or angled handles reduce wrist strain. They suit gardeners with arthritis, large hands, or long weeding sessions.
What Is a Weeding Fork Used For?
- Removing deep-rooted weeds such as dandelions, dock, plantain and bindweed
- Weeding between tight plantings, where a larger tool would crush your flowers
- Loosening compacted soil around the base of perennials
- Working in compost or fertiliser into the top few centimetres of soil
- Aerating container pots and raised beds
- Lifting small bulbs and root crops such as young carrots or radishes
- Transplanting seedlings with a protective ball of soil
A little-known bonus: the same motion that frees a weed also lets air and water reach nearby roots, so your plants benefit too.
Who Should Use a Weeding Fork?
- Flower border gardeners who need precision around delicate perennials
- Raised bed and container growers working in small, packed spaces
- Lawn owners battling dandelions and other taprooted invaders
- Vegetable gardeners weeding between neat rows of seedlings
- Older gardeners or anyone who wants a gentler way to weed, especially with a long-handled version
- Beginners, because the technique is simple and forgiving
If your weeds are mostly tiny seedlings on bare soil, a hoe may be quicker. If your problem is large, established roots across a wide area, you may want a full-size garden fork for weeding instead. We look at that difference next.
Garden Fork for Weeding: Can a Full-Size Fork Do the Job?
Many people search for a garden fork for weeding and wonder how it differs from the small hand version. Both rely on the same principle, but the scale changes everything.
A full-size garden fork, sometimes called a digging fork, has four thick tines and a handle about a metre long. You push it in with your foot, rock it back, and use your body weight to lift a big chunk of earth. That makes it excellent for couch grass, bramble roots and stubborn perennial weeds across a large bed.
The small tool, by contrast, works at arm’s length. It is gentle, accurate and perfect where you cannot swing a big fork without hitting your lavender.
Simple rule: use a full-size fork to clear a bed before planting, then switch to the hand version for ongoing maintenance.
Full-Size Garden Fork vs Hand Weeding Fork

How to Choose the Right Weeding Fork
Standing in a garden centre with six near-identical tools? Work through this list.
- Check the material. Forged steel is stronger than stamped sheet metal. Stainless steel resists rust, while carbon steel stays sharper.
- Test the tines. They should be firm and not flex when you push on them. Bent tines are the number one complaint with cheap tools.
- Look at the connection. A tang that runs deep into the handle, or a one-piece forged tool, lasts longer than a thin welded joint.
- Hold it. Does it feel balanced? Can you grip it comfortably with gloves on? Small hands may prefer a slimmer handle.
- Consider tine spacing. Close tines give precision in crowded borders. Wider spacing suits general weeding and lets soil fall through.
- Match the length to your body. Hand-held for kneeling, long-handled for standing. Choose a length that lets you stay upright if your back or knees complain.
- Think about the soil. Heavy clay demands strong tines. Light sandy soil is forgiving, and a lighter tool will do.
- Set a realistic budget. A decent hand tool is not expensive, but the very cheapest ones often bend within a season. Mid-range or professional-grade tools tend to pay for themselves.
When you can, handle the tool in a shop. Buying online makes it harder to judge sturdiness, so read reviews that mention bending or snapping.
How to Use a Weeding Fork: Step by Step
Technique matters more than muscle. Follow these steps and the roots will come out cleaner and faster.
- Pick your moment. Weed after rain or after watering. Damp soil releases roots easily, while baked, dry soil makes them snap.
- Wear gloves and kneel comfortably. A kneeling pad saves your knees and gets you close to the action.
- Identify the weed. Is it a taproot, such as dandelion, or a spreading root system, such as bindweed? That decides your approach.
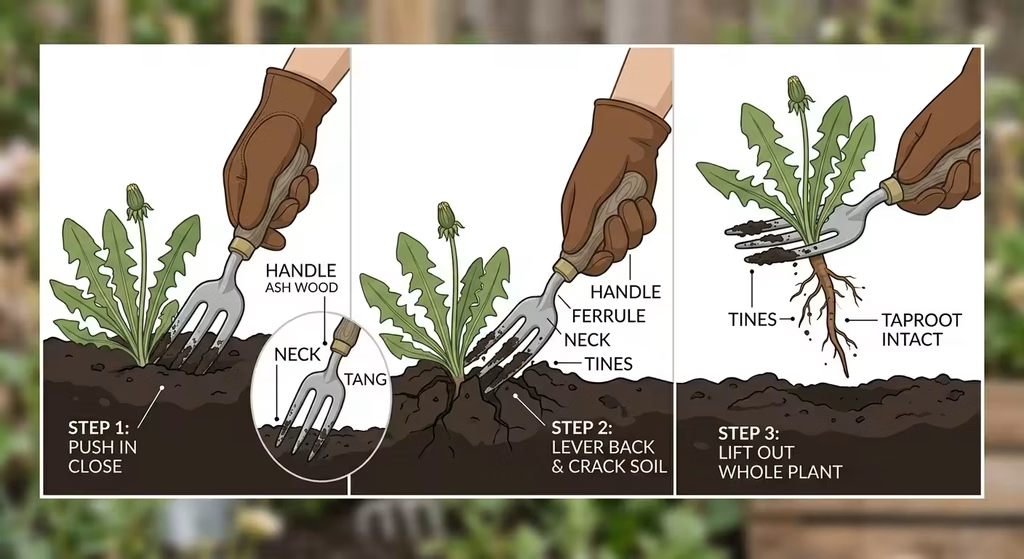
- Insert the tines beside the weed. Push the fork into the soil close to the base of the plant, angled slightly towards the root. Do not stab straight through the centre.
- Go deep enough. For taprooted weeds, aim to get underneath the root. Shallow cuts leave a piece behind that will regrow.
- Lever gently. Rock the handle back so the soil acts as a fulcrum. You should feel the earth loosen around the root.
- Wiggle side to side. A small sideways movement breaks the remaining soil grip.
- Lift the whole plant. Pull the weed steadily with your other hand while the fork holds the soil open. If the root snaps, go back in and chase the remainder.
- Fill the hole. Press the soil back down, and add a pinch of compost if you like. An open hole is an invitation for new seeds.
- Dispose of weeds properly. Seeding weeds and perennial roots should go in the bin or council green waste, not your compost heap.
Technique by Weed Type
- Dandelion, dock, thistle: These have a single deep taproot. Insert the fork at the base, go deep, and lever.
- Bindweed and couch grass: These spread by creeping roots. Work along the root line, loosening as you go, and remove every fragment.
- Shallow annual weeds: Scrape the fork across the surface to uproot seedlings before they set seed.
- Weeds growing against a plant: Angle the fork away from the plant and steady the crown with your free hand.
Pro Tips
- Weed little and often. A ten-minute session each week beats a weekend of battle.
- Tackle weeds before they flower, because every seed head you stop saves you hundreds of future seedlings.
- Work from the outside of a bed inwards so you do not trample cleared soil.
Step-by-Step: Using a Hand Fork to Lift a Weed
Can You Use a Kitchen Fork to Weed?
Plenty of gardeners swear by it, and the idea has been doing the rounds online. An old kitchen fork can scrape tiny weeds loose and pop out small seedlings between plants. The thin tines slip in easily and are gentle on neighbours.
But there are limits. Kitchen forks bend under real pressure, the handles are slippery, and they are not designed for leverage. They work for small, shallow weeds, not for long taproots. If you try it, keep the fork for the garden only and never return it to the kitchen drawer.
For anything bigger than a seedling, a proper hand weeding fork is a small investment that saves frustration.
Weeding Fork Maintenance and Care
A good tool should last for decades if you look after it.
- Clean after every use. Knock off soil and rinse the tines. Dried mud holds moisture and causes rust.
- Dry thoroughly. Wipe the metal with a rag before storing.
- Oil carbon steel. A light coat of camellia or machine oil keeps rust away. Stainless steel needs less attention.
- Sand and oil wooden handles. Once or twice a year, rub them down with linseed oil to prevent cracking.
- Straighten or replace bent tines. Slightly bent tines can sometimes be corrected, but a snapped one means it is time for a new tool.
- Sharpen the tips. A few strokes with a file keep points crisp so they slide into the ground easily.
- Store it dry. Hang the tool in the shed rather than leaving it in a damp bucket.
A bucket of sand mixed with a little oil is a classic trick: push the tines in and out a few times to clean and protect them in one go.
Common Mistakes to Avoid
- Weeding dry, hard soil. Roots snap instead of sliding out. Water first or wait for rain.
- Using the tool as a crowbar. Heavy prying bends tines. Loosen gently and let the fork do the work.
- Cutting the root instead of lifting it. If you slice through the taproot, the weed regrows. Go beneath it and lift.
- Leaving weeds to seed. One missed flower head can mean hundreds of new weeds next season.
- Ignoring prevention. Pulling weeds is only half the battle. Add mulch, landscape fabric or groundcover to stop new ones.
- Composting perennial weeds. Roots and seeds can survive your heap and return when you spread it.
- Neglecting tool care. A rusty, dull tool is harder to use, so clean it after every session.
How to Stop Weeds Coming Back
The best fork in the world cannot stop seeds blowing in on the wind. After weeding, try these prevention steps:
- Mulch: A layer of bark, compost or leaf mould blocks light and keeps seeds from germinating.
- Cardboard or landscape fabric: Lay it under mulch on bare areas for extra protection.
- Dense planting: Groundcover plants shade the soil so weeds struggle to establish.
- Water wisely: Water your plants at the base rather than sprinkling the whole bed, so weed seeds get less moisture.
- Spot-weed weekly: Catch new seedlings while they are small and easy to remove.
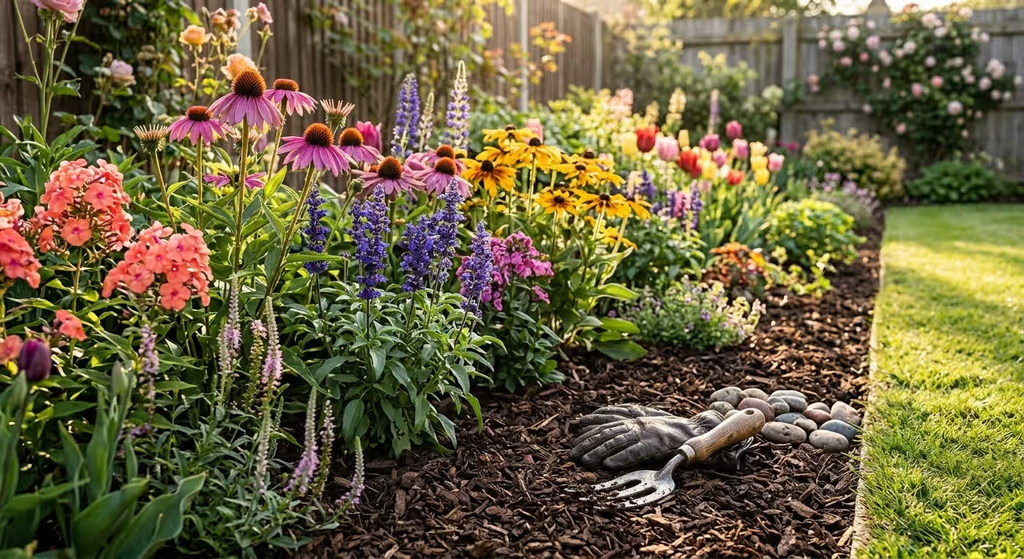
A Weed-Free Border Protected by Fresh Mulch
Best Time of Year and Day to Weed
Timing can double the value of your effort.
- Early spring: Weeds are small and roots are shallow, so they pop out with almost no effort. This is the most productive window of the whole year.
- Late spring and early summer: Growth explodes. A weekly pass stops seedlings from establishing and keeps your beds under control.
- Late summer: Focus on anything about to set seed. Removing flower heads now prevents a carpet of seedlings next year.
- Autumn: Clear perennial weeds while the soil is still workable. Roots lifted now will not return in spring.
- Time of day: Morning or early evening is gentler on you and on the soil. Midday sun bakes the surface and makes roots harder to release.
If you only have time for one session, choose the day after rain. The soil is soft, the roots slide out, and the job takes half as long.
How Soil Type Changes Your Technique
The same weed behaves differently depending on what it is growing in.
Clay Soil
Clay holds roots tightly when dry and turns sticky when wet. Wait until it is just moist, push the tines in slowly, and rock the handle gently. Forcing it risks bending the tool.
Sandy Soil
Sandy soil lets tines glide in easily, but taproots can snap because the soil crumbles around them. Go a little deeper than you think you need and lift slowly.
Loam
Loam is the easy one. Roots come out cleanly with a short lever and a gentle lift, so even a lightweight tool performs well.
Compacted or Stony Ground
Break the surface first, then work down in stages. Stones can chip tine tips, so a sturdy forged tool is a sensible choice here.
Staying Comfortable and Safe While Weeding
Gardening should leave you feeling good, not sore.
- Wear gloves. They protect against blisters, thorns and soil irritation.
- Use a kneeling pad or low stool. Your knees and back will thank you after the first ten minutes.
- Switch hands and positions. Alternating reduces repetitive strain, particularly in the wrist.
- Keep tines pointed away from you. When carrying the tool, hold it by the handle with the tines down, and store it with the points covered or hung out of reach.
- Keep it away from children and pets. Sharp tines belong on a high hook, not on the lawn.
- Know your weeds. Some plants, such as giant hogweed, can cause skin reactions. If you are unsure what something is, check before touching it.
- Take breaks. A short stretch every twenty minutes keeps you going longer.
Weeding Fork Buying Notes: What Do You Really Pay For?
Prices vary widely, and a higher price often reflects construction rather than branding. Budget tools are usually stamped from thin metal and attached to the handle with a basic joint. Mid-range tools often use forged or thicker steel with a stronger connection. Premium hand-forged tools from specialist makers, including Dutch and British toolmakers, are made to be used for a lifetime and are often repairable.
Before you buy, ask yourself three questions:
- How often will I weed? A weekly gardener benefits from a sturdier tool, while an occasional one can manage with a simpler design.
- How tough is my soil? Heavy or stony ground punishes cheap tines.
- Do I want a tool for life? If so, look for one-piece forged steel and a replaceable hardwood handle.
Many brands also sell matching trowels and cultivators in sets, which can be good value if you need to start a toolkit from scratch. If you buy a set, check that each tool feels sturdy individually, because a set with one excellent piece and three weak ones is no bargain.
Frequently Asked Questions
What is a weeding fork used for?
It is used to loosen the soil around a weed’s roots so you can lift the whole plant out. It also helps with aerating soil, working in compost, and transplanting small plants.
What is the difference between a hand fork and a weeding fork?
In everyday use the two terms overlap. A general hand fork often has wider tines for loosening and mixing soil, while a weeding fork usually has slimmer, more pointed tines for lifting roots. Many shops sell the same tool under both names, so check the tine shape.
Is a weeding fork better than a trowel?
For deep-rooted weeds, yes. The tines slide beside the root and lever it up, while a trowel scoops soil and often leaves root pieces behind. For planting and moving soil, a trowel is better, so many gardeners own both.
How do I use a weeding fork on a dandelion?
Push the tines into the soil next to the base, angled slightly beneath the taproot. Lever the handle back gently, wiggle side to side, and lift the plant out whole with your free hand.
Can I use a garden fork for weeding?
Yes, a full-size garden fork works well for large areas and tough perennial roots such as couch grass. For small beds and tight spaces between plants, a hand-sized tool is more precise.
Should I weed when the soil is wet or dry?
Slightly damp soil is best. It releases roots cleanly. Very dry soil makes roots break, and waterlogged soil is heavy and damages soil structure.
Is a stainless steel or carbon steel fork better?
Stainless steel resists rust and needs little care. Carbon steel is often stronger and holds a sharper point but must be dried and oiled. Choose based on how much maintenance you are willing to do.
How many tines should a weeding fork have?
Two tines suit taprooted weeds and tight borders. Three or four tines cover more soil and suit general loosening. Pick based on the weeds you fight most.
How often should I weed my garden?
A short session once a week keeps weeds from setting seed and stops small problems becoming big ones.
Can I compost weeds I pull with a fork?
Young annual weeds without seeds can usually be composted. Weeds with seed heads and persistent roots, such as bindweed or couch grass, are better binned or sent for green waste.
Final Thoughts
A weeding fork is not flashy, but it does one job brilliantly: it removes weeds roots and all, without wrecking the plants you want to keep. Choose forged steel and a comfortable handle, weed when the soil is damp, insert the tines beside the root rather than through it, and finish with a layer of mulch so the weeds stay away.
Do that, and your border will thank you. So, which weed is first on your list this weekend? Pick up your fork, kneel down, and get started. And if you found this guide useful, share it with a gardening friend who is still snapping dandelions off at the neck.
Satisfying Result: A Whole Weed Pulled With Its Root